
Oral Hygiene
Oral Hygiene and homecare are the most important part of dentistry. As part of our professional cleanings and soft tissue management programs we stress patient homecare. We feel as though it is our responsibility to teach you how to care for you teeth and gums. Without your help at home, nothing we do will have success long term.
Brushing Your Teeth
When you visit us for your professional cleanings, we are always happy to teach you brushing techniques that will remove the maximum amount of plaque from your teeth. Here are some tips to serve as a reminder and to make your brushing sessions even more productive.
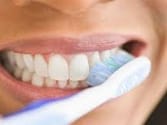
Always use a toothbrush with soft bristles with rounded tips, to avoid damaging your gums.
Hold your brush at a 45-degree angle towards the gum line (the area where teeth and gums meet).
Using a gentle, circular motion, move the brush around one or two teeth at a time, overlapping as you move along.
It’s also a good idea to have a regular brushing pattern. It’s fine to use any pattern you wish, as long as you clean each surface of each tooth. For example:
- Start with the insides of your upper teeth, and brush from the right side to the left.
- Move to the insides of your lower teeth, from the left side to the right.
- Brush the front of all upper teeth, then the front of all lower teeth.
- Then brush the chewing surfaces of your upper teeth, then your lower teeth.
- Use the tip of your toothbrush to brush the backside of your front teeth.
Flossing
If you have areas that are difficult to clean with floss, you may need to use either Superfloss or a floss threader. Both are inexpensive and easy to use, and will make flossing hard-to-reach places easier. They are particularly useful under bridges and between the bands and wires on braces.
Superfloss
 Superfloss has an end that is stiff, so it threads easily through tight areas. It also has a fuzzy, tufted segment that helps remove plaque and food particles as you floss. Superfloss is used the same way as regular floss, except you thread it between your teeth by inserting it from the side, next to the gum line. Slide the Superfloss under your bridge or your archwire, pull into a C shape and floss both sides of every tooth.
As Superfloss is thicker than regular floss, it is easier to floss teeth that are next to a wider-than-normal gap, and it decreases the time necessary to properly clean these larger tooth surfaces. Since Superfloss is sturdier, it is also a good choice if the floss that you currently use shreds when you run it between your teeth.
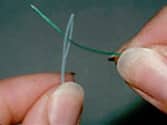 A floss threader helps you maneuver regular dental floss through tight spaces under bridges and braces. Pull about 18 inches of regular floss through the loop of the floss threader. Then insert the opposite end of the threader under the bridge or up to the braces until the floss is where you want it to be, and pull into a C shape, cleaning both surfaces of every tooth. Rinse with plenty of water when you are finished.
Superfloss and floss threaders can help maximize the effectiveness of your oral homecare. They make it easier to floss every day, so you can eliminate plaque and prevent periodontal disease and cavities.
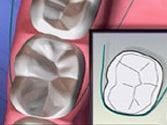
It’s important that you floss between your teeth once a day. Most cavities and gum disease start between your teeth, where your toothbrush just can’t reach.
 Flossing removes the plaque from between the teeth and below the gum line. Plaque is the culprit in tooth decay and gum disease. It is a sticky, invisible film of bacteria and food residue that regularly attaches to the teeth. If you don’t floss every day to remove the plaque that forms daily on your teeth, the plaque will harden into tartar (also called calculus) which can’t be removed by brushing or flossing. Tartar causes even more problems, as it traps the destructive bacteria against the tooth and gums.
How to floss properly
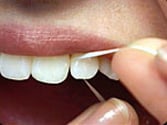
 Break off about 18 inches of floss, and wind most of it around the middle fingers of each hand, leaving about five inches of floss unwound. Pinch the floss between your thumbs and index fingers. Gently glide the floss down between two teeth, using a side-to-side sawing motion. If it’s difficult to fit the floss between your teeth, or if it snags or tears, let us know. These are problems that need to be fixed.
- Pull the floss tightly into a C shape around the side of your tooth, and slide it under the gum line.
- Clean the side of the tooth, using an up-and-down motion.
- The floss will ‘tell’ you that you have removed all the plaque by squeaking a little as it rubs against your tooth.
- Repeat the process on each side of every tooth, using a fresh section of floss each time.
It’s normal for gums to bleed a bit when you first start flossing. After a week or so of daily flossing, the bleeding should stop. If it doesn’t, be sure to let us know.
Which floss to choose?
There are many types of floss on the market today – waxed and unwaxed; fine floss and dental tape; flavored and unflavored. Each are equal in their ability to remove plaque from between your teeth. We would be happy to recommend a floss that is well suited to the conditions in your mouth.
Use of Mouth Rinse
Power Toothbrushes
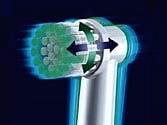 Numerous clinical studies have shown that brushing with a power toothbrush can be more effective than manual brushing. The brushing action of a power toothbrush loosens and removes plaque much more effectively than manual brushing. A power brush moves over your teeth much more quickly, and uses different motions than you can with a manual toothbrush. This means that, during the same amount of time, your teeth are cleaned more effectively, with many more brush strokes than they would be when you brush manually. Also, according to the Academy of General Dentistry, “one of the major benefits of power toothbrushes is that people are more likely to brush properly and for the full two minutes suggested by dentists for optimum plaque removal.”
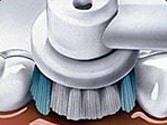 Using a power toothbrush may be an excellent tool for many patients, especially for patients with limited manual dexterity.There are many types of power toothbrushes and each offer advantages. Most offer advantages when used correctly, but for some people they may be an unnecessary expense because those people can clean their teeth effectively with ordinary toothbrushes.
Am I using my power toothbrush correctly?
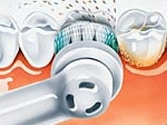 Remember, it isn’t necessary to press hard or scrub when using a power toothbrush. Simply let the brush do all the work! In fact, one of the benefits of using a power toothbrush is that you use much less pressure than you would with a manual brush. Guide the brush head slowly from tooth to tooth, following the curve and shape of the gums and teeth. Hold the brush head in place for a few seconds before moving on to the next tooth. Don’t forget to move the brush over every surface of each tooth, including the often-forgotten backsides. Brush the gums as well as the teeth, paying particular attention to the gum linethe point where the gums meet the teethboth in back and in front of each tooth.
Comments are closed.